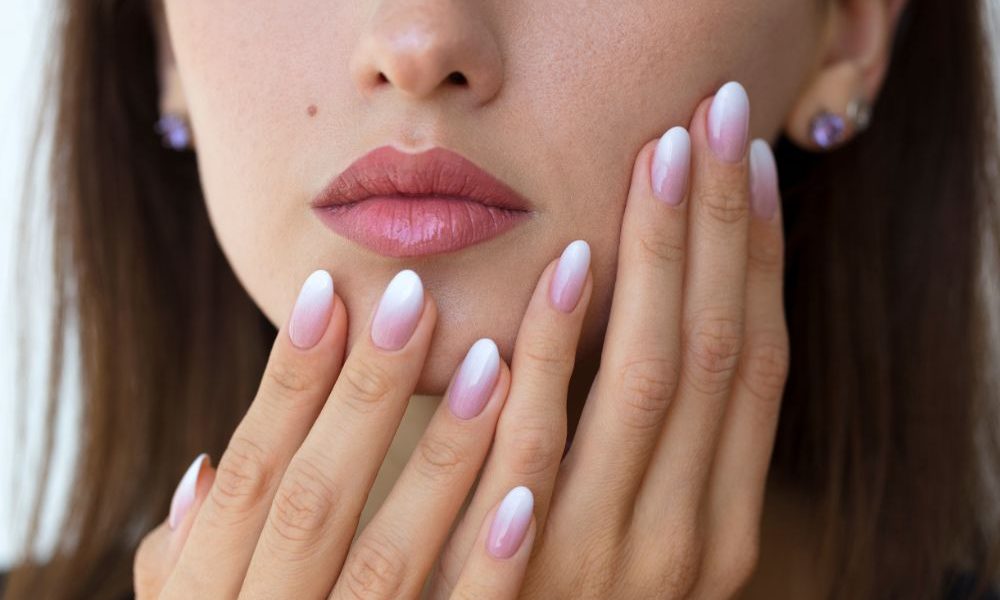
Ombre nails are a beautiful and trendy way to add some flair to your manicure. This style features a gradient effect that transitions from one color to another, creating a stunning and unique look. While it might seem complicated, you can achieve ombre nails at home with a little patience and the right tools. This guide will walk you through the steps to create perfect ombre nails yourself.
Why Ombre Nails?
Ombre nails are not just visually appealing; they also have psychological benefits. A study titled “The Effects of Nail Polish Color and Design on Mood and Self-Esteem” (2022) found that ombre nail art can positively impact mood and self-esteem, especially when using bright and bold colors. Another study, “The Role of Nail Art in Enhancing Social Bonds and Expressing Individuality” (2023), highlighted the social and psychological benefits of nail art, showing how it can facilitate connections with others and provide a way to express personal style.
What You Need
Before you start, gather the following supplies:
- Base coat
- Two or more nail polish colors (choose shades that blend well together)
- Makeup sponge
- Nail polish remover
- Cotton swabs or small brushes
- Top coat
- Nail art brush (optional)
Step-by-Step Guide
1. Prepare Your Nails
Start by removing any old nail polish and trimming and shaping your nails. Clean your nails thoroughly and push back your cuticles. Apply a base coat to protect your nails and help the polish adhere better.
2. Apply the Base Color
Choose the lightest color as your base. Tina Zhang, a nail artist at New York Fashion Week, suggests applying the lightest color to the base of your nails. Apply two coats of this color, allowing each coat to dry completely.
3. Prepare the Sponge
Take a makeup sponge and apply the two colors side by side. Make sure they slightly overlap in the middle to help with blending. Use thin, overlapping strokes to create the gradient effect, starting with the darkest color at the tips and blending it into the lighter shade at the base, as advised by Lisa Bacik, owner of Lux Nail Salon.
4. Apply the Gradient
Gently dab the sponge onto your nail, starting from the base and moving to the tip. Repeat this step until you achieve the desired gradient effect. You may need to reapply polish to the sponge after a few nails.
5. Blend the Colors
For a more seamless transition, use the sponge to lightly blend the colors where they meet. This may take a few layers, so be patient and let each layer dry completely before applying the next. Julie Kandalec, founder of Julie K Nail Polish, recommends applying multiple thin layers of polish and allowing each layer to dry completely to prevent streaks or patchiness.
6. Clean Up
Use a small brush or cotton swab dipped in nail polish remover to clean up any polish that got on your skin around the nails. This will give your manicure a neat and professional look.
7. Seal with a Top Coat
Finish with a top coat to add shine and protect your ombre design. This step also helps blend the colors further and smooth out any texture from the sponge.
Additional Tips
Use a Nail Art Brush
For a more defined transition between colors, use a nail art brush to carefully create a straight line between the two colors. Emily Jonsson, creator of @NailDesignSwatches on Instagram, suggests this technique for a more precise look.
Experiment with Colors
Don’t be afraid to experiment with different color combinations. Ombre nails can be done with any colors, from subtle pastels to bold neons. Try seasonal colors or match your nails to your outfit.
Practice Patience
Achieving the perfect ombre nails takes practice. Don’t get discouraged if your first attempt isn’t perfect. Keep practicing, and you’ll improve over time.
Personal Insights
From my own experience, creating ombre nails at home has become a fun and rewarding way to express creativity. I found that using a combination of a sponge and a nail art brush gives the best results. A friend who loves nail art shared that she enjoys experimenting with different textures, such as adding a glitter top coat to her ombre nails for a festive look.
Conclusion
Creating ombre nails at home is a great way to add a stylish touch to your manicure. With the right tools and techniques, you can achieve a professional-looking gradient effect. Remember to be patient, practice, and have fun experimenting with different colors and styles. By following these steps, you’ll be able to create beautiful ombre nails that boost your mood and allow you to express your unique style.